 Hi Readers,
In this article we will discuss How to setup Credential Type NavUserPassword with Business Central 16 (2020 Wave 1).
This article is based on Request from @Tanya Kharbanda as discussed during last #NAVBCOpenDiscussion.
Alternatively you can use Dockers so that you don't need to do all these steps. But if you want to setup NavUserPassword in On-Prem Installation then follow these steps.
Step 1. Review & Prepare Database for NavUserPassword.
1. Check that your database is accessible with Windows authentication. With this step you verify that your database is correct and correct license file is imported in the database.
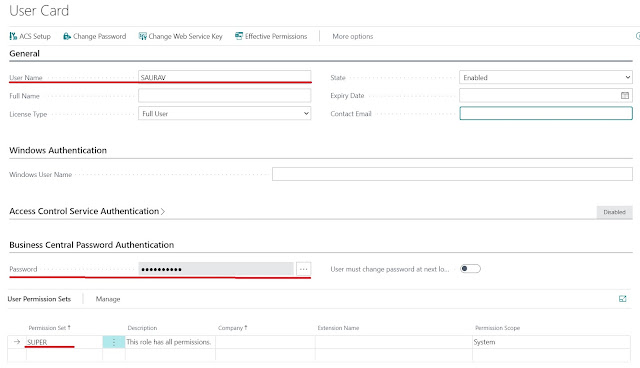
2. Add a SUPER User in database with Username and Password.
Create a User in Navision. For Demo I am using - Username - saurav, Password - Manager@135
Download PowerShell Scripts From TechNet. (LINK)

Step 3. Create the Certificate.
1. Extract the Zip File Downloaded in Step 2.
2. Open a PowerShell prompt with the option As administrator.
3. Go to the directory where you saved the New-SelfSignedCertificateEx.ps1 file.
4. Run the following command: Import-Module .\New-SelfSignedCertificateEx.ps1.
5. Confirm to run the command from Untrusted publisher.
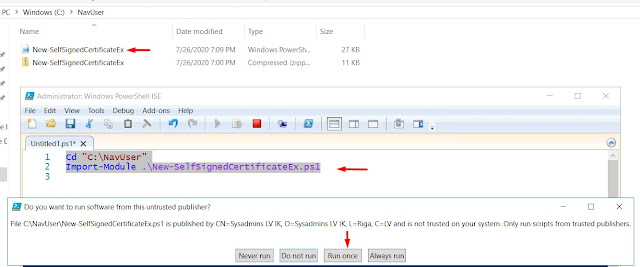
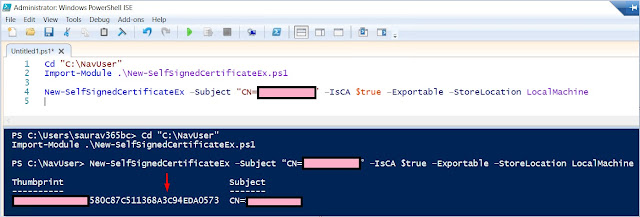
6. Then Run the command to generate the certificate.
New-SelfSignedCertificateEx –Subject “CN=<your site name>” –IsCA $true –Exportable –StoreLocation LocalMachine
Where -
<your site name> = Machine Name of the Server where Navision Service Tier Is Installed.
Go To My Computer Properties and Full Computer Name is the Parameter Value.

7. Certificate will be generated once we execute above command as shown below.
Keep the Certificate Thumbprint Saved.
Step 4. Update the certificate Permission to Service Account.
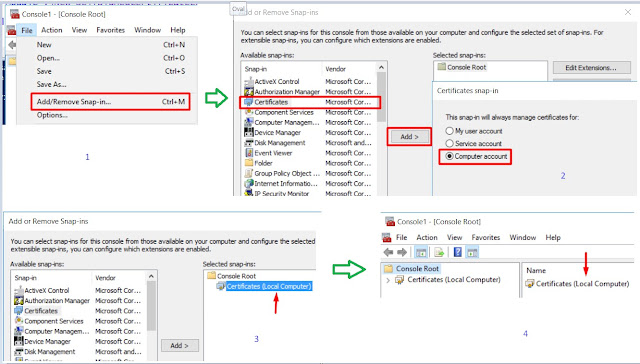
1. Open the mmc.exe.
2. Go to the File menu, and then choose Add/Remove Snap-in...
3. Select Certificates.
4. Choose Add.
5. Select the computer account.
6. Choose Finish and then OK.
7. Select the certificate under Personal Certification, right-click and choose All Task and Then Choose Manage Private Keys.

8. Add New Account, Select Account which is used for Running Service and Set Full Control to Service.
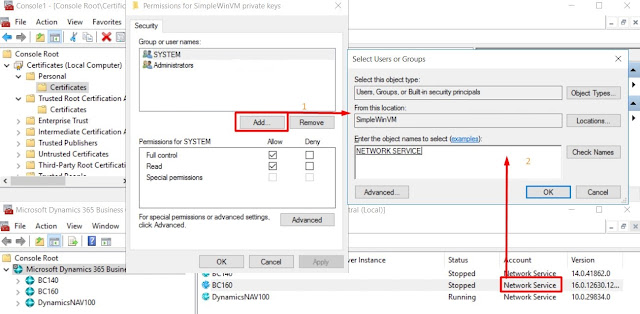
Optional -
9. If your Dynamics NAV Service Account and Web Server are different then you need to Export Certificate and import in Web Server Server.

Step 5. Update Service Tier.
1. Certificate Thumbprint - From the Certificate that we created in above Step 3(7).
2. Credential Type - NavUserPassword
3. Stop and Start the Service.

We are almost done, just need to update Certificate in webserver for Modern Client.
Step 6. Update Web Server Configuration File.
1. Open IIS Manager.
2. Right click Website and Choose Explorer.
3. Filter Folder with Type = Json.
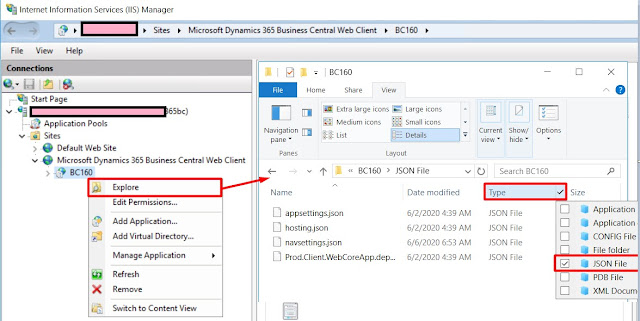
4. Open navsettings.json and update following parameter - ClientServicesCredentialType to NAVUserPassword.
** You May get an Permission Error. You should have permission to Update this folder.
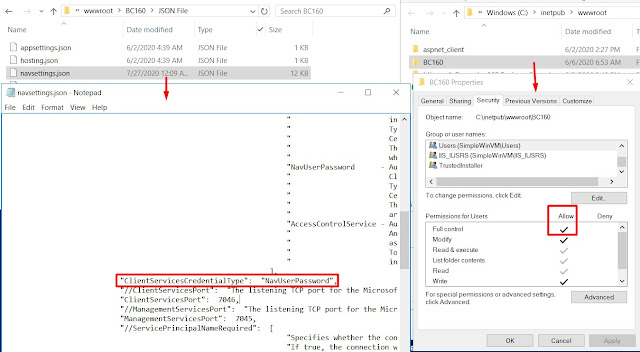
Step 7. Update Webserver and Map SSL Certificate With Website for Modern Client.
1. Open IIS Manager.
2. Select Microsoft Dynamics 365 Business Central Web Client.
3. From Right Hand Panel Select Binding and create a Binding for https using the certificate you added in Step 1, as shown below.
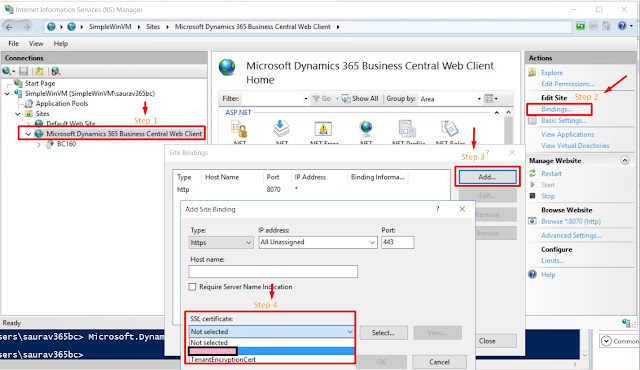
4. Stop and Start the Web Site.
5. Browse web client using https://<<Certificate Name>>/BC160/
6. Open Modern Client.
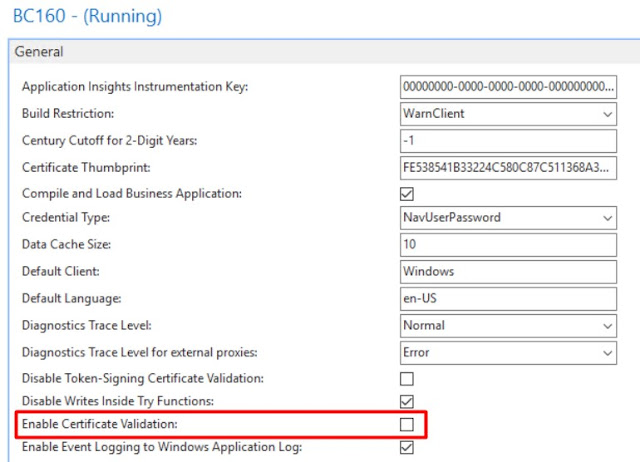
I tried Running Modern client and it didn't work. So after searching and researching more about it, We need to set one more setting in Service Tier.
1. Set Enable Certificate Validation = False.
2. Restart NAV Service and Try again to Open Modern Client.
7. Web Client is working with username and password.
Hope this article helps you to setup NavUserPassword with Business Central #Msdyn365bc.
Let me know if you have any questions.
Stay connected, there is lot coming up.
Regards,
Saurav Dhyani


Thanks for the article Saurav
ReplyDeleteCan you please share how to have Windows and NavUserPassword both ?
Hi Rishikesh,
DeleteIts Simple. You can create a additional service and Credential Type = Windows and create a New Web Server Instance mapped to that service.
Let me know if you need any help with that too.