 Hi Readers,
Continuing from the Last post where we discussed the new feature of Monitoring SQL Database Deadlock that is released with Microsoft Dynamics NAV 2017.
In this article, we will discuss steps to Enable the feature on a database. This article will be used when we want to set-up in a customer environment.
** For the Demo I am using Network Service account. Suggested to use a Domain account to run Navision services.
** These steps need to be done for the account that is used for Running NAV Service Tier.
For Enabling the feature, we need to do set-up in three areas -
- SQL Server Instance.
- SQL Server User.
- Dynamics NAV Service Tier.
1. Configure the SQL Server instance -
Connect to SQL Server Instance using SQL Server Managment Studio.
From SQL Server Instance Properties - grant the login both Alter any event session and View server state permissions.
2. Configure the SQL Server User -
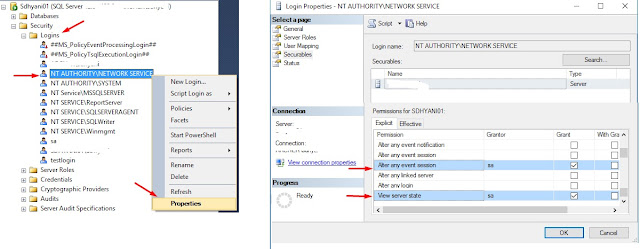
Connect to SQL Server Instance, Under Security Node select Logins, Select the User Account.
From the User account Properties, Navigate to Securable, Under Explicit node grant the login both Alter any event session and View server state permissions.
3. Configure the Dynamics NAV Service Tier -
Open Microsoft Dynamics NAV Administration, Edit the Service Instance and then select the Enable Deadlock Monitoring check box in the Database section.
4. If you would like to Use SQL Queries and Powershell cmdlets then use below commands -
4.1- Update Microsoft Dynamics NAV Service Tier-
--------------------------------------------------
Set-NAVServerConfiguration -ServerInstance DynamicsNAV -KeyName EnableDeadlockMonitoring -KeyValue true
--------------------------------------------------
Where DynamicsNAV - Service Name
4.2- Update SQL Properties-
--------------------------------------------------
USE [master]
GO
CREATE LOGIN [domain\accountname] FROM WINDOWS
CREATE USER [domain\accountname] FOR LOGIN [domain\accountname]
GRANT SELECT ON [master].[dbo].[$ndo$srvproperty] TO [domain\accountname]
GO
USE [Microsoft Dynamics NAV Database]
GO
CREATE USER [domain\accountname] FOR LOGIN [domain\accountname]
ALTER ROLE [db_owner] ADD MEMBER [domain\accountname]
GRANT VIEW DATABASE STATE TO [domain\accountname]
GRANT VIEW SERVER STATE TO [domain\accountname]
GRANT ALTER ANY EVENT SESSION TO [domain\accountname]
--------------------------------------------------
Where [Microsoft Dynamics NAV Database] - Navision Database Name
and [domain\accountname] - Account Use to Run Navision Service Tier.
MSDN References.
Hope you find the information useful. Let me know your views as comments to the article.
Stay Tuned for More.
Regards,
Saurav Dhyani
saurav-nav.blogspot.com


Comments
Post a Comment